Disclosure: If you make a purchase through the links posted below, I may receive a small compensation. Read the full disclosure.

Like I mentioned nine thousand other times, I stayed up late last night making Halloween treat buckets for L’s school party tomorrow. I originally planned on just using treat bags, but once I saw the fun pails Lynsey made for her son’s class, I knew I wanted to use pails too! So after school yesterday I hustled the boys to Target and snagged the last 20 Halloween’ish buckets Target had in the dollar spot. After I scooped them all up, I saw some other mom frantically looking for pails. Sorry lady, these babies are mine! I was so lucky they had them because L was over it and I would have had to buy him a fresh slurpee at every Target I dragged him to so that he’d be on his best behavior.
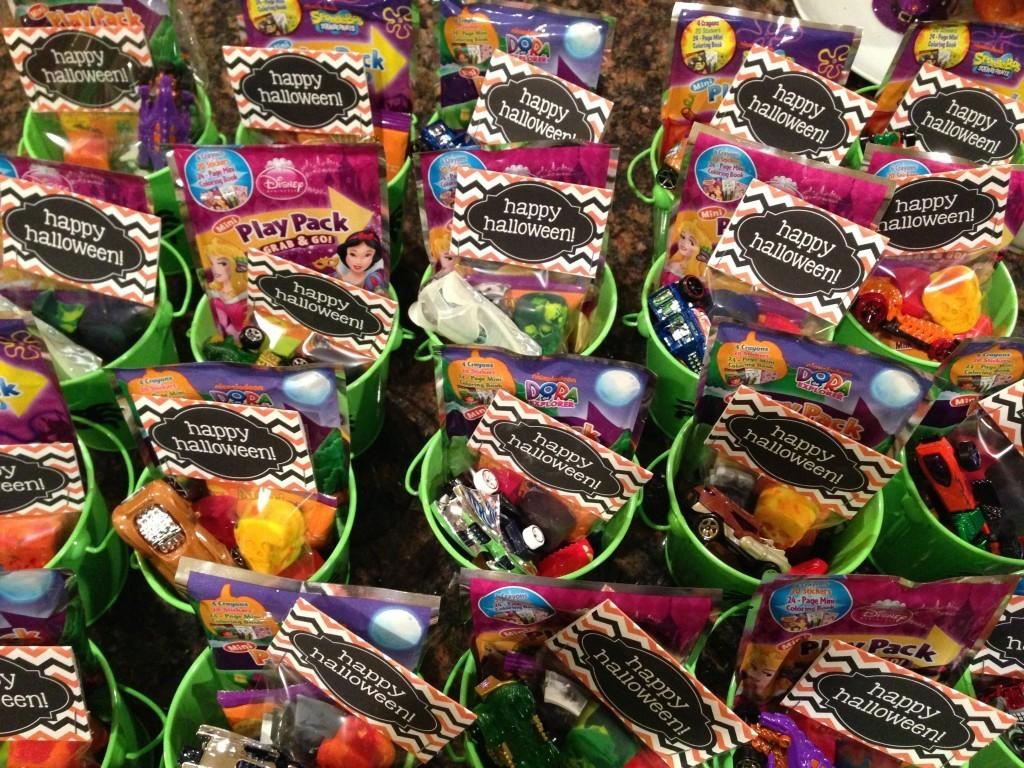
I filled the pails with Mini Play Packs (coloring books / stickers / crayons), a matchbox car (thank you 90% off clearance), two pieces of candy, a bag of bunny grahams, and two homemade crayons (a skull and a bat).
The most time consuming part was making the crayons, which should come as no surprise to anyone who has done this. I have never used “face” molds (I got both the bat and the skull ones from Amazon) before and I am very pleased with how they turned out.
I couldn’t find any bag toppers that I liked, so I bought some from Etsy for $5. I could have had them personalized, but since I wanted them asap, I opted not to have them customized. They didn’t exactly fit the bags I had on hand, so I just trimmed them down.
And here is the final product, all ready to pass out! I bagged the contents of this one, but can’t decide if I want to do them all. I figure it would be less mess for the kids if they drop them, but more work for me.
I also made mummy juice boxes yesterday. These are all over Pinterest, so I am sure you have seen them by now. But this is my blog, so I will tell you about them anyways ;).
Wrapping the boxes is pretty self explanatory, but you have to remember not to cover the hole for the straw. This took me forever since my “fancy” hole punch sucks for projects like this. I need to get a normal one in case I ever attempt this again. At first I tried using white duck tape, but I did not like the way they looked. As if a 4-year old is going to care. But I did. So I dragged the boys to Home Depot after Target for vinyl tape. I found it on an end cap in the electrical aisle and it worked PERFECT. And it comes in like 10 colors in case you need it for something else.
After you wrap the boxes, stick the eyes on and then add another piece of tape over the eyes to make it more mummy like and you’re done!
So there you have it, all my Halloween preparations for L’s school. And done with a day to spare! Oh and I should mention that I signed up for juice boxes because I thought it would be “easy”. Ha. I can turn any simple task into a huge time consuming project!!
What’d you sign up to bring to your child’s Halloween party? Paper plates and napkins seem to always be the first thing picked here ;). And what are your kids passing out to their friends?
