Disclosure: If you make a purchase through the links posted below, I may receive a small compensation. Read the full disclosure.

Doodle Crate is one of the new(er) lines in the Kiwi Crate family. Designed for girls ages 9-16, Doodle Crate includes all the materials and inspiration for DIY projects such as patterned pouches, friendship bracelets, or colorful candles. Crates encourage girls to tackle new challenges and gain creative confidence!
Doodle Crate
Cost: $19.95/month.
Ships To: United States and Canada.
Coupon Code: Use code “SHARE30” to save 30% off your first month of Kiwi Crate and their family of boxes!
Doodle Crate ships via FedEx Smart Post and usually takes about a week to arrive to me.
I am far from a teen/tween, but I subscribe to Doodle Crate for myself. I find the projects to be (fairly) simple, fun to do and relaxing.
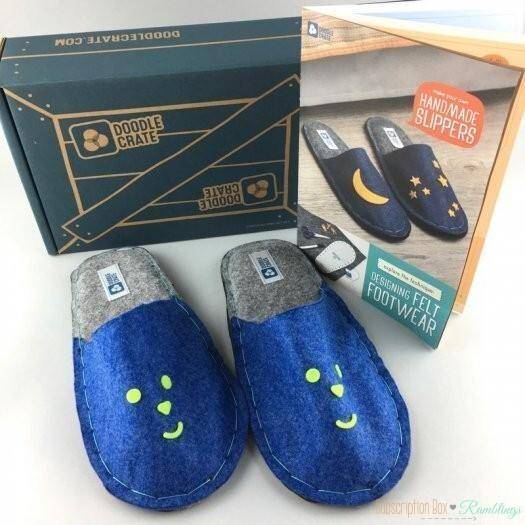
The April 2017 Doodle Crate explored the technique “Designing Felt Footwear” and included the materials necessary to make your own Handmade Slippers.
Materials included in this crate were Padding, Foam, Scissors, Templates, Thread, a Pen, Clips, Scissors, Needles, Felt, Felt Stickers, Double-Stick Strips, and Tags. Additional materials necessary were clear tape, scrap paper and glue (optional).
The box includes full instructions, but if you need additional help, they also have a video on their YouTube channel.
The first step was to make the sole.
The crate included four sole sizes (labeled A, B, C, and D). You picked the one that fits your foot best and use it for your template.
After selecting the right size template, I traced around it using the included pen and made sure to poke little holes to perfectly match the template. There are 3 holes which have circles around them and are used as guide holes when making your slippers.
After tracing templates for both soles, I trimmed the foam down to match the template size.
The second step was the insole.
This was just like the sole step, but involved felt instead of foam. Instructions on here were clear, and I was breezing right along!
The 3rd step was to size the cushion for your slippers.
Again, no issue here. You trace the cushion template against the cushion (a squishy foam) and then cut to size. Again, super easy!
Step #4 was to create “The Upper” or the top of your slipper. The box included two different color felts, so you could either do slippers all in one color or use both colors. I opted to use both colors.
Creating the upper was just like making the insole. Trace using the template and then cut to size. Easy!
Step #5 – Stitching It Together
Ahh, now this is where things started to get complicated. It was time to start sewing.
But before the sewing started I needed to stick all the layers together. However, I had already used the double stick strips (oops), so I had to find some glue dots around the house to use. It ended up working out just fine. The guide holes came in handy to make sure that everything was perfectly aligned.
Ready to start!
The box included three clips to keep the upper in place.
With the exception of the cushion, all of the layers needed to be sewn together – including the foam sole.
The slippers needed to be sewn twice. Once you got back to your starting position, you had to go back in the opposite direction to fill in all gaps that didn’t have stitches yet.
I somehow messed up my first slipper (shocking I know) and ended up having to do a little surgery on it :). Basically, I recut the blue upper after it was (wrongly) sewn on to make it work for what I had done. In hindsight, I could have just taken the stitches out and redone it as I had plenty of extra material.
The second slipper was MUCH easier to sew and took me about half the time the first one did.
The final step was to add the Doodle Crate sticky labels and to add designs on your uppers. I *could* have added the designs before I did the sewing, but I opted to do it after. Totally a personal preference. I was planning on making mine look like the ones on the cover of the instruction booklet – with the moon and stars, but the box didn’t include any precut stars. I knew mine would end up looking awful, so I used some of the precut ones ;). I also ended up trimming down my foam soles as it was sticking out in a few places.
I have to say, I love these, and I am impressed that this didn’t turn into a failed project for me. I am not a sewer (not at all), but I did it, and these aren’t going to fall apart in two seconds either. I am pretty proud of myself!
So cute!!!!!!!
What do you think about Doodle Crate? Did you get a box this month? How did your slippers come out?If you are interested in subscribing, Doodle Crate is currently offering 30% off the first month of a new subscription with coupon code “SHARE30” at checkout.
