Disclosure: If you make a purchase through the links posted below, I may receive a small compensation. Read the full disclosure.

Adults & Crafts delivers customized DIY craft kits to your door each month. Boxes will include everything you need to go from zero to crafting hero—materials, instructions, and (most) tools you need to complete any one of their unique projects.
Adults & Crafts
Cost: $39.95/month.
Ships To: United States.
Coupon Code: “RAMBLINGS” to save 10% off.
Disclosure: This complimentary box was received for review purposes. All opinions are my own, and no compensation was received.
Adults & Crafts ships via USPS, FedEx or UPS depending on what they are sending that month and your location. My box shipped via USPS Priority Mail.
Any project that involves painting is a winner in my book!
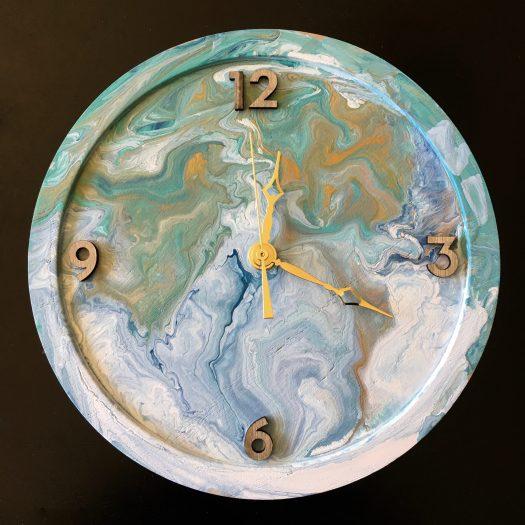
This month’s box featured a Clock Making Kit. The instructions included two painting options – Fluid or Geometric. I opted to follow the Fluid Paint Instructions.
Materials included were:
~Clock Face
~Clock Mechanics Kit
~Clock Numbers
~Masking Tape
~Battery
~Cups
~Paint (5 Colors)
~Transfer Paper
~Paint Brush
~Geometric Outline
~Glue
Additional supplies needed were:
~Scissors / Pen
~Newspaper
~Straightedge
Since I followed the Fluid Painting Instructions, I first filled 4 cups with paint (1/2 inch of paint plus a few drops of water) and one cup with a glue medium (again 1/2 inch of glue and a few drops of water). I am not 100% sure what the glue medium did, but I want with it.
Getting the paint on the clock itself was a little messy. You flip each of the cups onto the clock for about five seconds (one at a time) and then slightly lift and swirl the cup around on the face. I used too much paint, so my clock was quite saturated in paint. Still, I found it hard to get paint on the edges of the clock. The lip really holds the paint in there. I ended up using a brush and just tried my best to make it look like I didn’t use a brush to get paint on there.
I let my clock dry for about 18 hours (the instructions recommend 12 hours) and then added the numbers (I just attached them with glue) and the clock face. The box included all of the numbers, but I was worried about not being able to get them all even, so I just used the 12, 3, 6 and 9.
The instructions to attach the clock face were included on the box the clock face came in and were easy to follow. Still, I was pleased to see that my clock moved perfectly once I had it all attached and added the battery.
I thought this turned out great! I may go back and paint the numbers on the clock, but I am not sure what color I want to do them in, so I am going to hold off for now.
What do you think of Adults & Crafts? If you are interested in subscribing use coupon code “RAMBLINGS” to save 10% off!
