Disclosure: If you make a purchase through the links posted below, I may receive a small compensation. Read the full disclosure.
Adults & Crafts delivers customized DIY craft kits to your door each month. Boxes will include everything you need to go from zero to crafting hero—materials, instructions, and (most) tools you need to complete any one of their unique projects.
Adults & Crafts
Cost: $44.99/month.
Ships To: United States.
Coupon Code: “RAMBLINGS” to save 10% off each month for the life of your subscription.
Disclosure: This complimentary box was received for review purposes. All opinions are my own, and no compensation was received.
Adults & Crafts ships via USPS, FedEx or UPS depending on what they are sending that month and your location. My box shipped via USPS Priority Mail.
This box was heavy, but I had no idea what the project was from this first look!
Candles! The January 2017 Adults & Crafts theme was “Geometric Candle Kit.”
Materials
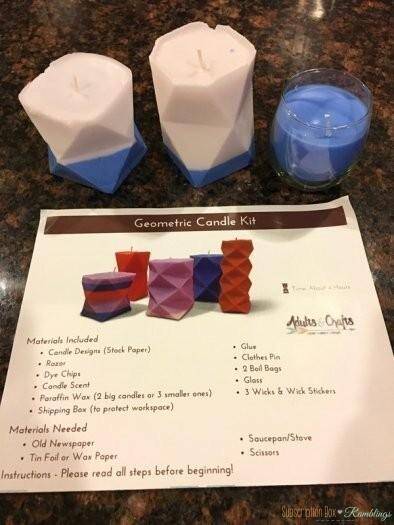
The box included most all of the necessary materials for the project – candle designs, razor, dye chips, paraffin wax, glue, clothespin, two boil bags, glass, three wicks and wick sticks. The only things I needed were scissors, a saucepan, water and tin foil.
Candle Designs
I must say, these candle designs looked pretty intimidating. The box included a razor blade to cut out the pattern, but I found it easier to just use scissors instead. The instructions weren’t totally clear on how to fold these, but I eventually figured it out. Once I figured out the first one, the second was easy, but it was a tedious process. What the instructions were clear on, though, was that all the edges needed to be sealed tightly so that the wax didn’t seep out. I used both the included glue AND tape and assumed I would be okay.
Adding the Wicks
Adding the wicks was easy. I wish they would have included more than one clothespin though to keep the wick(s) in place. I made do with just one, but 2 or 3 more would have helped.
Melting the Wax
Melting the wax was super easy. I melted three bars at a time and had zero issues.
Making the Candles
I was totally sure I had sealed my candle forms very well, and then I poured the wax in. Wrong. Wax seeped out everywhere. Ugh. I had already invested a lot of time in this and was started to stress that it wasn’t going to turn out. I think I may have broken a sweat. It was too late to turn back, though.
What I decided to do was to let the first layer I poured in dry completely. I left the wax that had seeped out just where it was.
Doing this formed a (real) seal which let the second layer of wax (not all of it, but most of it) stay in the candle form. Somewhere along the way I also poured in the candle scent. The instructions didn’t say where to use it or how much to use, so I just guessed.
All Finished
It wasn’t easy, but my candles turned out! Peeling off the paper candle form was easier than I had expected it would be. And all the wax pooled around the bottom of the candle also just peeled off the paper. It wasn’t my intention to make layered candles, but that’s how it ended up working out.
Glass Candle
The box also included a little glass votive. I have no idea what it was for (there was no mention of it in the instructions), so I poured some wax in there and used my last wick (the box included three) to make a candle. By far this was the easier candle I made from the box.
Final Thoughts
This was one of the more challenging Adults & Crafts projects. I think the instructions could have used a little more detail and there has to be a better way to sea up those candle forms so that wax doesn’t seep out so easily. My mom and I were thinking maybe super glue? School glue just didn’t cut it and it, was difficult to hold the oddly shaped candle form in place while it dried. Still, I am pleased with my candles and quite proud of how they turned out.
What do you think of Adults & Crafts? If you are interested in subscribing use coupon code “RAMBLINGS” to save 10% off each month for the life of your subscription!

